Friday 19 August 2011

Exercise 4: Shutter Speeds

This exercise requires me to take a series of image of a moving object (or objects) at different shutter speeds. It should be quite obvious that it will introduce motion blur if the shutter speed is slow enough. My questions are as follow:
1)      We are going to hit slow shutter speed, but how slow do we need? What is the balance between blur and detail?
2)      Can I get good image even in the case when the motion blur is not obvious (ie relative fast shutter speed.
In order to answer the first question, I need some sort of way to measure the speed of the object, even at a pseudo science level. Sadly, I don’t have a speedometer. After some thought I think I can make use of somewhere that has a strictly reinforced speed limit.
There is at least one infamous place where police cameras are set up at the entrance and exit. The urban legend is they use the images before and after to check the time for your car to pass. If your image shows up at the exit too early, you will get a speeding ticket in mail. Not only that, I was told that it follows up with a two and a half hours of speed awareness workshop.


The speed limit is only 20m/h. Most people are driving at the speed limit unless there is a jam ;)


We can also approximate the field of view of the camera, the length of the Tower Bridge can be found in first image in Wikipedia (http://en.wikipedia.org/wiki/File:Tower_bridge_schm020.png)

Cool, let's rock and roll.


So I start with this image.
Image 1: 28mm f/5.6 ISO 800 at 1/50s


Hmm, I don't like it.


Look, the intention here is clear. At the end I want to take pictures at slow shutter speed so that I can see the trace of light on the road. At slow shutter speed, it makes sense. At 1/50s, this picture is just boring.


Ok. I am flipping it around. I actually have nice background here. Why don't I get some of it? The end result is something like this:

Image2: 28mm f/32 ISO 100 at 10sec

Better. But why I feel everything leaning on the right? 

Here is a problem. I think I am not accustom to look around at the frame enough. I know what I am trying to get, I just shoot and miss the details. Damn.

Let's start all over again before it gets too dark. I will  move my camera a little bit. We start with fast(er) shutter and go down.

Image 3: 28mm f6.3 ISO 800 at 1/20s

Image 4: 28mm f/6.3 ISO 400 at 1/10s

Image 5: 28mm f/6.3 ISO 200 at 1/5s

Image 6: 28mm f6.3 ISO 100 1/3s

Image 7: 28mm f/11 ISO 100 at 1.3s

Image 8: 28mm f/16 ISO 100 at 2.5s

Image 9: 28mm f/20 ISO 100 5sec

Image 10: f2.8 f/32 ISO 100 10sec


Even with this composition, the picuture is still slightly heavy on the right hand side. I reckon the best to do this shot is in the middle of the road between two lanes with a wide angle lens, so that the tower is at the middle. Of course, I will get arrested if I set up a tripod there. I move the tower as close to centre of the frame as possible. There is a trade off: because I am clearly on one side of the road, if I force the tower to centre, I will get least light from the car but more stupid people who leaning on the fence taking picture (As you can see, there are shadows around the lower right corner). Of course I can keep the overall exposure darker so that those shadow are darker and blend into the background. But then there is another trade off. If the overall exposure is darker, the details on the first tower look darker as well. 

You really can't have it all, unless, you buy up the whole town : D

Last but not the least, the whole idea to get to somewhere with speed limit is to compare that to shutter speed. So how are we doing? From the diagram from Wikipedia and the photographs taken is about 2/3 of 270 feet (82m), which is roughly 54m. The 20mph speed limit translate to roughly 9m/s. As a result it takes a car slightly less than 7 seconds to get through the frame. This is consistent with the result we see: We can almost unbroken beam across the frame at 5s and 10s exposure. Notice that in image 10 I was already at f/32 and ISO 100, therefore, I can't really run the camera any slower without risk of over-exposing the photograph while getting a continuous light beam.

Friday 12 August 2011

Exercise 8: A Sequence of Composition

Due to many reasons, I jump to exercise 8 first. I will do the exercise in order starting next week from exercise 1.

In this exercise, I am required to follow the subject around and record all the moment that is "almost" right. It think the exercise wants to make me stick around the screen for a while instead of snapping one shot and leave.


By the way, I will start labelling my photographs in numbers going forward. I think this is a good practice since I am now doing this Art of Photography course, who knows one day I need to discuss my work with my tutor and we want to refer to a particular photograph?


When planning for this exercise, I thought it would be a good experience if I attempt something that I have not tried before. After speaking to my friend Trung, he told me about the leisure centre that he and his friends play football in the evening. Then when I arrived, he told me that the folks at the big field is very good, so I went to take some shots.


The subject I am after is a team called "Aston Carter FC" (the green team). They are based in Leyton and are playing for the London summer football league.


Just arrive at the field, a player is putting on his boots and shoes.
Image 1: 200mm f/5.6 ISO 1600 at 1/200s

Then, the match started.
Image 2: 160mm f/4 ISO 1250 at 1/160s

Two teams were fighting to get the ball.
Image 3: 200mm f/4 ISO 1250 at 1/160s

Oops, the guys from the other team got the ball.
Image 4: 200mm f/4 ISO 1250 at 1/160s

 A player from Aston Carter FC got control of the ball, and trying to fend off the guys from the other team.
 Image 5-8: 200mm f/3.5 ISO 1250 at 1/160s


It is already dark, but both team is still trying very hard. As the lighting condition get poorer, I have to stick with larger aperture and higher ISO, which mean getting the correct focus will be more difficult.

Image 9: 70mm f/2.8 ISO 1600 at 1/160s

The guys are trying hard.
Image 10: 200mm f/2.8 ISO 1600 at 1/160s

The ball is up there!
Image 11: 200mm f/2.8 ISO 1600 at 1/160s

Obviously, the other team is not going to give up easily.
Image 12: 130mm f/2.8 ISO 1600 at 1/160s 

Image 13: 170mm f/2.8 ISO 1600 at 1/160s

Somebody is trying to stop him..
Image 14: 170mm f/2.8 !SO 1600 at 1/160s

Then it almost went off the side.
Image 15: 130mm f/2.8 ISO 1600 at 1/160s


Then the ball went off the other way. Everybody is chasing it.
Image 16: 200mm f/2.8 ISO 1600 at 1/160s

Other people are going along. Picking up speed here.
Image 17: 130mm f/2.8 ISO 1600 at 1/160s

Image 18: 130mm f/2.8 ISO 1600 at 1/160s

I think they made it this time. So I miss the shot...
Image19: 200mm f/2.8 ISO 1600 at 1/160s

Not soon after this, the game ended. The players are all exhausted. They went off to the branch to get some water.
Image 20: 200mm f/2.8 ISO 1600 at 1/160s

Image 21: 200mm f/2.8 ISO 1600 at 1/160s

End of the game. The field is now quite again.
Image 22: 200mm f/2.8 ISO 1600 at 1/160s

This is my first attempt to photograph a football game. I guess it happens to be at night add some more difficulties, but I try to use the field as background, so I catch some light bouncing off the grass. Those images usually look better than those against a dark background at the far side. The most difficult part is using autofocus. Because the players coming in and out of the frame, and because the depth of field is shallow, the AF system got confused very often on which part of the frame it is focusing. I think next time I should try doing manual focus and see if I can get better result. The other issue is, even with a 200mm lens, it is not giving long enough reach. Therefore, all the images above involved some sort of cropping. Also, I leave some spacing in case the players suddenly dashing off the frame. I hope as I got more experience, I can keep a tighter frame on the players.
I think having the subject as the whole team instead of a particular player (not that I know any of them) makes this assignment slightly easier.

Tuesday 9 August 2011

Exercise 2: Focus with set aperture

Exercise 1 requires printing out image and checking distance, which is more troublesome, so I will start on Exercise 2 first.


In this exercise, I will take three photographs of the same screen with the largest aperture available. The depth of field decreases when relative aperture increases. Because I am using the largest aperture, the focus will only fall on a particular range of distance and left everything else slightly blurry. Ok, let’s try some shots. In Picasa, it has an image property called "subject distance" which track where the focus at. So let's check that out as well (not that I can see it when I am shooting).
 50mm f/1.8 ISO 200 at 1/320s Picasa "subject distance" = 1.5m


50mm f/1.8 ISO 200 at 1/320s Picasa "subject distance" = 2m


50mm f/1.8 ISO 200 at 1/320s Picasa "subject distance" = 4.29e+009 m

I have a problem: I don’t really like these. I feel that the near focus image is too heavily weight on the lower right hand corner, and the middle image is not that much difference visually.
I checked Michael Freeman’s manual again on the set of shots he made, and wonder why all three shots he got look quite decent (ie not a single one that is totally superior to the other). I notice one thing: in the near focus image, the subject that comes into focus occupied more than half of the picture. If the front subject occupied too much down in the corner, the image will be sinking to one side. Which comes back to a question, what is the subject I try to emphasis? If I want to emphasise the front of the fence (as if something interesting there, but that begs the second question), then it should occupy more area of the image.
Of course, the second problem is, the fence alone is not really that interesting. Fair, the colour (blue and gold) is nice on the shots.
Ok, let’s try one more set. Think about this: The focus nob on my 50mm f/1.8 lens has scales on it. It goes from 0.45m to 3m then the next one is infinity. If I want to take advantage of the focus range, my closest subject should be about half a meter away, the far one is more than 3m away, then the middle one is somewhere like 1-2m. I need something big in the front so that the subject is not sinking to one side when I focus at the closest distance. Let's try this:
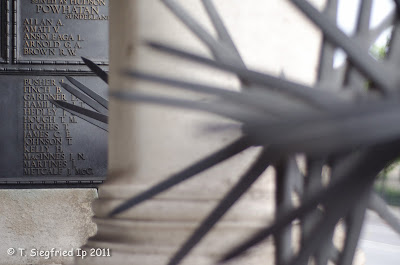
 50mm f/1.8 ISO 400 at 1/250s Picasa "subject distance" = 0.71m


50mm f/1.8 ISO 400 at 1/250s Picasa "subject distance" = 1.19m


50mm f/1.8 ISO 400 at 1/250s Picasa "subject distance" = 2.51m

Better than before, but the colour is quite dull here. 


Ok. My preference. For the first set with fence and lamp post, I prefer the one focus at the far end (3rd one). And for the second set with the spikes, the front and middle focus works better. 


Why so? 


For the first set of images, the further focus one occupied more area in the frame, it looks balance (and probably too typical). The front focused one is fine only if something special happening at the lower right hand corner, but there isn't any. I will wonder what is the point to focus at that spot. 
In the second set, however, I am not too keen to read the words a the far end. The spike gives more interesting shape and direction. The middle one works better here than the front one.


Sunday 7 August 2011

Exercise 0: Certain Basics in Photography

There are a few questions in the "Get to know your camera" section that caught my eyes:


What the f-stop numbers stand for?
How the lens aperture controls the light reaching the film?
How the shutter speed controls the light?


Ok, do I know the answer? I know the new few exercises will be providing "some understanding". But before that, why don't I go to the drawing board and try to run this through theoretically and see if I roughly get the concepts?


Consider for a moment that the camera is a box with a hole, and light enters from the hole in front. Simple logic: the bigger the hole is, the more light we can possibly get. Entrance area is approximately circle, the area is approximate Pi*r^2. If we speak of radius, everybody can easily understand why increase the radius by sqrt(2), the area of the circle increases by 2.


Let's introduce f-stop = focal length / diameter = focal length / (2* radius)


This f-stop is also known as relative aperture, or just "aperture".


So we want to double the light entrance, we either make the radius sqrt(2) time larger, or make f-stop swinks by sqrt(2). Let's start with f-stop of 1 and calculate sqrt(2) multiple of it and go down the row.


ActualRounded (usual f-stop)
1 1.0
1.41421356237311.4
2 2.0
2.828427124746192.8
4 4.0
5.65685424949238 5.7
8 8.0
11.313708498984811.3
1616.0
22.627416997969522.6


Take my Nikon 50mm f/1.8D as an example:

f/# Diameter (mm)Area (mm^2)
1.8 27.78606
2.8 17.86250
4 12.50123
5.68.93 63
86.25 31
114.55 16
163.138
22 2.274


The lens take 52mm filter so its diameter is about 52mm. In theory if we don't need the element that control focus, apeature size, ignore distrotion around the edges of the lens and assume we can hold the lens in the tube, it is possible to make the 50mm an f/1 without increasing the diameter.


Let's try one more example with a Sigma 70-200mm f/2.8, say I set the lens at 200mm.


f/# Diameter (mm)Area (mm^2)
2.8 71.43 4,007
450.001,963
5.6 35.71 1,002
8 25.00 491
11 18.18 260
16 12.50123
229.0965


The lens takes 77mm filter, so roughly the diameter of the lens is about 77mm. At it widest aperture, the lens really "wide open". With the same aperature, the diameter is different if the focal length is different. This tells me that if a lens is a telephoto and also a fast (low f-stop) lens, it probably will be bigger. So if there is a lens with focal length 200mm with f/1, I am expecting the lens has diameter at least 20 cm, which is going to be huge and heavy.


One strange thing I noticed. If you keep both lens at f/2.8, the calculation indicates that the lens with 50mm focal length will have aperture size of 250 mm^2, while the 200mm one will have aperture size over 4000 m^2. Well, the general photography knowledge says that the exposure by increasing the aperture size. If this is true, then isn't 200mm f/2.8 can handle low light photography better than a 50mm f/2.8? After all, it has 16 times the area. But they are both f/2.8!


I found it mystifying when I first come to this conclusion. After some research, I found an American Electrical Engineer, Mr Doug Karr has written an article about this. The misconception is when we said "exposure", it is not just light intensity, but illuminance.The lens in front of the camera transforms the light from the object to the final image hitting the sensor. During this transformation, one multiples the incoming light flux per area (luminance) by the solid angle (in unit steradian). If a camera is a box with a hole, we care about the real size of the aperture (the hole), but because of the lens, we care about the solid angle span by some parallel beams hitting the lens and focus at the focal point. In this case although the aperture area is large, the focal length is also longer. Thus the solid angle of the light cone merges at the focal point is unchanged. In that calculation of the solid angle (area/ radius^2), we get the ratio of (lens diameter)/(focal length). What is (lens diameter)/(focal length)? The inverse of aperture (f-stop)!


For the details, please read Mr. Kerr's article here:


http://dougkerr.net/pumpkin/articles/Photographic_Optics.pdf


Try this: grab a zoom lens and set the f-stop to the largest (easier to see), now move the focal length to short to long, watch the area of the aperture.


It is interesting to note that I usually think of light as photons. So if I have a larger hole for light beam to enter, in theory I should larger number of photon and more energy. However, I suspect that photon is really a concept in quantum theory while we are mainly looking at the classical wave theory here. If we really want to go pure quantum theory, it is hard to describe what exactly happen to the wavefunction when it interacts with the lens. We can probably find answer in a Quantum Optics text, which I doubt I can manage to read one.


Honestly, I am so glad that this course is called "ART of photography" but not "SCIENCE of photograph". 


Let me get my camera out and take some shots. This is probably easier.

Friday 5 August 2011

Exercise 0: Get to know your camera

The course material arrived in the mid-week. Many thanks for Royal Mail for their express and quality service.
Ok here is the course book with exercises. Other things in the package are less interesting so I will look at it later.
The very first exercise has to do with reading the camera manual :P.
Where did I hide it, by the way?
I remember last time when I read it, I fell asleep at the 39 point AF system and it automatically track colour (ie, how the camera what to focus on). This is more of like a sales brochure; do you have the code or scientific journal on exactly how it recognizes the focus area?
Therefore, instead of camera manual, I read Ken Rockwell’s D7000 user’s guide in plain English. Here is the link
Not everybody likes Ken, but at least he has much more sense of humour than the guy who wrote the official Nikon manual. Also, he mentioned what does the button does in reality what he prefers. Of course, what Ken prefers is not always what I prefer. He prefers shooting in Jpeg normal, but I prefer shooting in raw and fix the white balance in the post process. I don’t use AutoISO either; I usually shoot mainly in manual mode if not aperture priority if I need a very quick snap (nothing special about aperture priority, but it is right next to manual mode on the dial).
This is something new I learn and (just) tried: set up copyright info © Siegfried Ip inside the camera.
These are several new things that I now know but still have not tried:
1)      Bracking Button: maybe I should try shooting at least one HDR sometime in this course :D
2)      U1 and U2 button: hmm, let me set something in U2 since it is also close the manual mode on the dial. But what should I put in?
3)      Flash mode and sync speed: I should give it a try one day, but I am not a big fan of flash, especially not on camera flash. But then if you need flash and the only one you have is the one on your camera, what do you do?
I tried the mirror up before, but I don’t know if they make a difference in image quality. I only use limited amount of shutter speeds so I am not the best person to ask. 
I think in the past I somehow manage to avoid learning many internal camera operations by shooting in raw with manual mode. Of course, if the camera is not doing it for you, you end up in doing it later. The questions pop up later in post processing. “To know your camera” is a very ambitious task. Try asking yourself this:
1)      What colour space do you choose and why?
2)      Have you calibrate your monitor so you see what you shoot and/or print?
3)      Do you use noise filtering somewhere and what it is really doing?
Seriously, do you really want to know what your camera is doing? Jpeg did #1 and 3 for you. As long as it is not looking so bad, do you really want to know the details?
I don't blame the guy who shoots in auto everything. My phone does more or less the same.
Can we shoot yet?

Wednesday 3 August 2011

Pre-course setup

I tried logging on the oca-student.com and put a post on the forum to introduce myself. A lady named Eileen told me that there is a flickr group for OCA students that I can post my photographs and join in discussion. I think this will be very helpful to talk (even only online) to other students to get some ideas and inspiration on the forthcoming assignments. Therefore, I signed up for flickr and tried to upload one photograph just to make sure everything works.


I may use it later on, who knows? Here is my photostream address.


http://www.flickr.com/photos/siegfried_ip/

Monday 1 August 2011

Before We Start...

Today I signed up for the online course from Open College of Arts (OCA). The first course is called Art of Photography. This is a test post. I just want to run a test post and see if it is possible for me to post a learning log with image on this site.

I hesistated for a long time on whether I should sign up or not. I don't think I have any life after my day job and training. Let along finding time to do the assignment on this course.

But then...

I don't think it is possible to improve on my photography skill, in fact, any skill, unless I practice it. If I don't bother to polish it, there is no point to own any proper photography equipment more than a smart phone. I am not sure how much and if photography is important to me, but I remember that moment, there is something I want to say, and I am sure if I had captured that shot and show you, you will understand.

I missed that shot. So when I spoke of the girl from Pink Jukebox, people think that I am crazy.

So let it be it.

I still want to know if I am capable to express what I think in the photographs I take.

On top of it if I can survive in work, training and some additional course work. If I am setting myself up to hell, let me run there at full speed.
Anyway, let's try to load a test image as well. What is photography? What are we trying to capture and why? What is a good picture and why is it so good? If equipment solves all my trouble, then D3s, or even MF are damn cheap these days.